Introduction
At DETL, we specialize in crafting stellar software applications that seamlessly blend hardcore engineering with sleek design. Our mission is to deliver both mobile and web applications that provide exceptional user experiences without compromising on aesthetics or functionality. In this blog post, we will guide you through how to implement an image picker in your Expo React Native application. This feature will allow users to upload a profile image, adding a personal touch to their profiles.
Why Implement a profile image picker?
Personalisation is a key factor in enhancing user engagement within an app. Allowing users to upload a profile image not only personalises their experience but also creates a deeper connection with the application. In this blog post, we’ll show you how to implement this feature using Expo’s ImagePicker, enabling users to select and upload profile pictures seamlessly.
Overview
Before embarking on this journey of explaining to you how to allow users upload their profile image, I’d like to first break down the topics just so you’ll have a solid idea of what we will be covering in this blog post.
- Installing Required Packages
- Requesting Permissions
- Allowing Users to Pick an Image
- Uploading the Image to the Backend
- Updating the User’s Profile Picture
We will explain each step in detail so you are not left confused :)
Step 1: Installing Required Packages
Before we start, make sure you have Expo React Native application configured so that you can install the following package called expo-image-picker.
1expo install expo-image-pickerStep 2: Importing Necessary Modules and Setting Up State
In your profile component file, import the necessary package and as well as create the necessary states that will handle the uploading of the image.
We have a folder called profile -> index.tsx and we place the code which we will show you below inside of the index.tsx file.
We have declared two states, the first state saves the selected image and the second state is a loading state which we will use when we are making an API call to our backend to save the image to the users profile. We also import expo-image-picker .
Step 3: Requesting Permissions and Picking an Image
We need to request permission to access the user’s media library and then allow them to select an image.
1const pickImage = async () => {
2  // Ask for permission to access the gallery
3  const { status } = await ImagePicker.requestMediaLibraryPermissionsAsync();
4  if (status !== 'granted') {
5    Alert.alert(
6      'Permission Denied',
7      'Permission to access gallery was denied'
8    );
9    return;
10  }
11
12  // Launch the image picker
13  const result = await ImagePicker.launchImageLibraryAsync({
14    mediaTypes: ImagePicker.MediaTypeOptions.Images,
15    allowsEditing: true,
16    aspect: [1, 1],
17    quality: 1,
18    base64: true, // Include base64 in the result
19  });
20
21  if (!result.canceled) {
22    setLoadingImage(true);
23    const completeBase64String =
24      'data:image/png;base64,' + result.assets[0].base64;
25    uploadProfilePicture(completeBase64String, result.assets[0].uri);
26  } else {
27    setLoadingImage(false);
28    Alert.alert('Error', 'Failed to select image');
29  }
30};
When we request access from the user we check if the status was granted, if not then we throw an alert. Once the status has been granted, the app will automatically navigate to the users media library where their images are stored.
Firstly, it is important to note that when we pick the image the user has selected, we make sure that we have access to the base64 format of the image since that is what we will be sending back to the backend when we make our API call.
Secondly, as you can see from the code as shown below is that we attach a string to the result.
1const completeBase64String =
2      'data:image/png;base64,' + result.assets[0].base64;
3    uploadProfilePicture(completeBase64String, result.assets[0].uri);
The selected image returns a base64 without the first part of the image data:image/png;base64, which is important, otherwise our backend will not be able to process the image correctly. What we do is attach a base64 image string to the result we get from the image picker so that our backend is able to process the image accordingly. This is a specific use case and can as well be handled by your backend but it is much easier in its implementation on the frontend.
So far we have selected our image, received the equivalent base64 result of that image and now we will make a backend call with the base64 result of the image which is shown in the above code as such uploadProfilePicture(completeBase64String,result.assets[0].uri) .
Step 4: Uploading the Image to the Backend
We need to send the selected image to the backend server to update the user’s object. Whenever the user is re-authenticated, the image is then fetched from their profile and displayed on the app.
1const uploadProfilePicture = async (base64Image, uri) => {
2  const endpoint = 'user';
3  const method = 'PUT'; // Use PUT as per your requirement
4
5  try {
6    // Prepare the data object
7    const data = {
8      profilePicture: base64Image,
9    };
10
11    // Make the API request
12    const response = await actionProvider.makeRequest(endpoint, method, data);
13
14    if (response.status === 200) {
15      Alert.alert('Success', 'Profile picture updated successfully');
16      // Optionally, refresh user information
17      fetchUserInformation(session);
18      setLoadingImage(false);
19      setSelectedImage(uri);
20    } else {
21      Alert.alert('Error', 'Failed to update profile picture');
22      setLoadingImage(false);
23    }
24  } catch (error) {
25    setLoadingImage(false);
26    console.error('Error uploading profile picture:', error);
27    Alert.alert(
28      'Error',
29      'An error occurred while uploading the profile picture'
30    );
31  }
32};
In simple steps we will explain to you what is happening in the code above.
- Data Preparation: We create a data object containing the base64 image which we will send as a payload within the API call.
- API Call: We make a PUT request to the backend API to update the user’s profile picture.
- Note: Replace
actionProvider.makeRequestwith your actual API endpoint method (e.g., usingfetchoraxios). Since we have a hooks file where we make all of our API calls, we have placed our endpoint url in this file so that we can import it wherever we need to make an API call. - Handling Responses: We check the response status and update the UI accordingly.
Step 5: Displaying the Profile Image
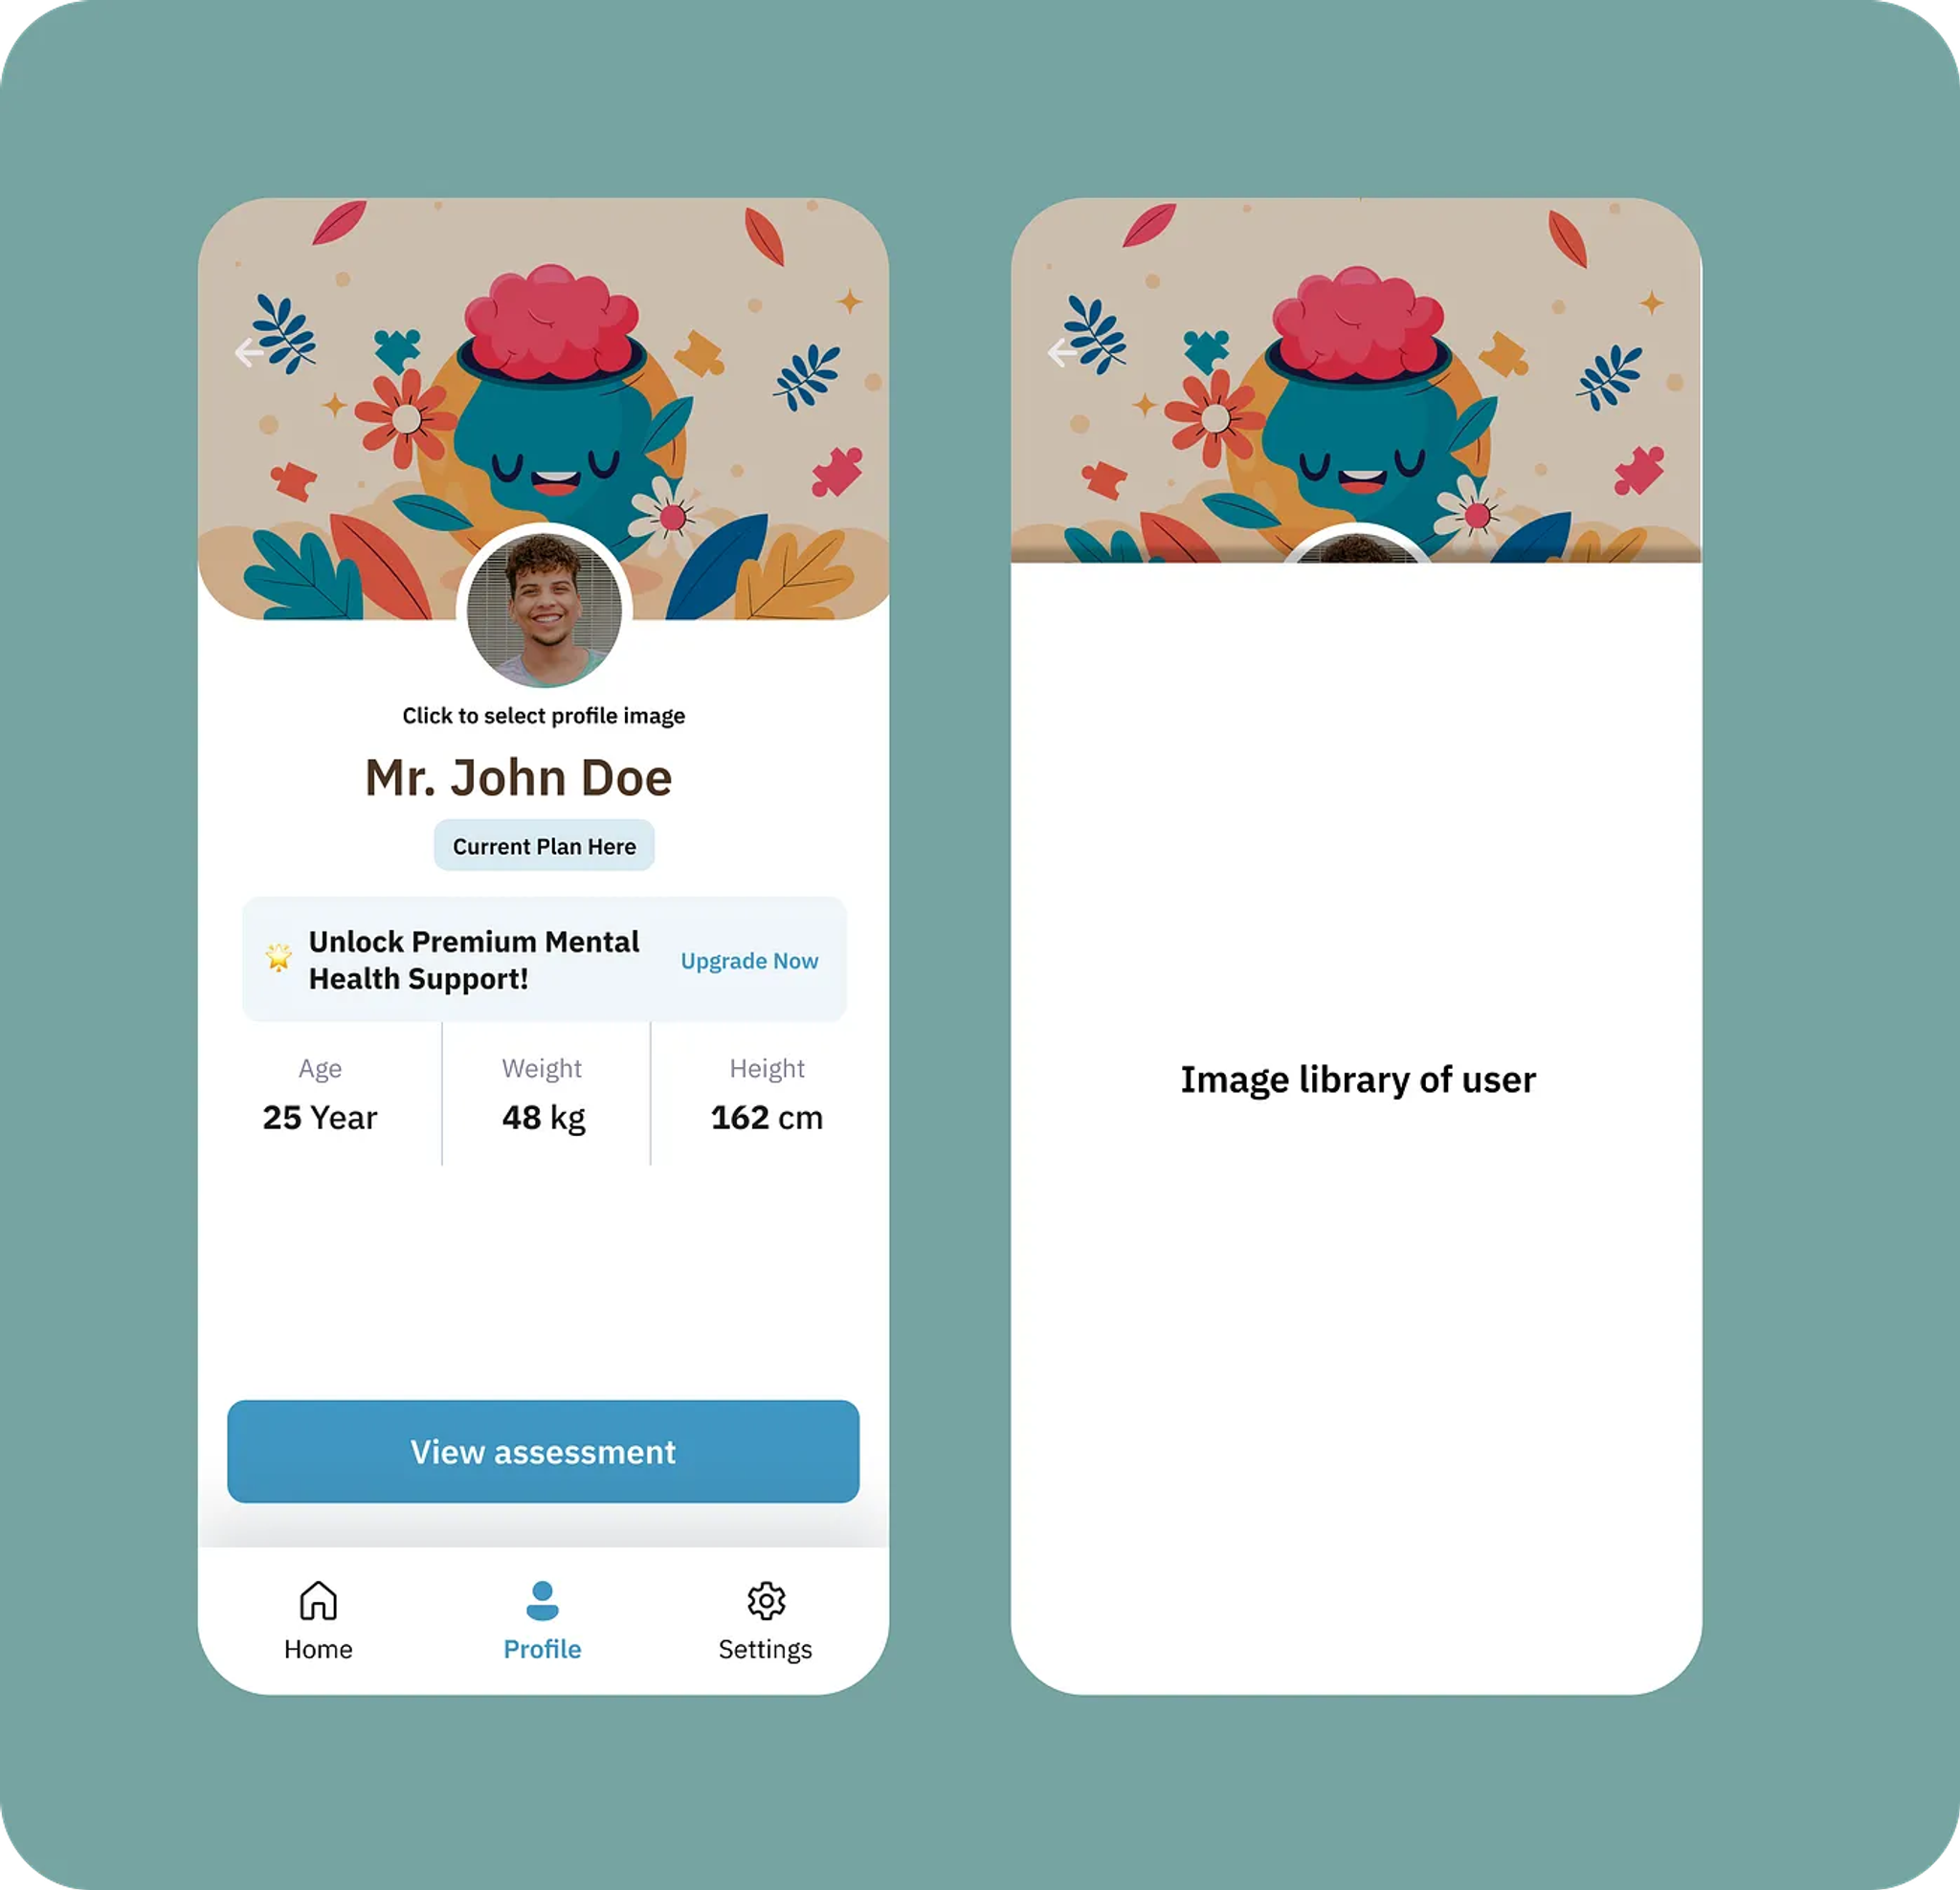
We update the UI to display the user’s profile image or a placeholder if none is set.
1<View style={styles.profileImageContainer}>
2  <TouchableOpacity onPress={pickImage} activeOpacity={0.8}>
3    {loadingImage ? (
4      <View
5        style={[
6          styles.profileImage,
7          {
8            justifyContent: 'center',
9            alignItems: 'center',
10          },
11        ]}
12      >
13        <ActivityIndicator color={'#4096C1'} />
14      </View>
15    ) : selectedImage ? (
16      <>
17        <Image
18          source={{ uri: selectedImage }}
19          style={styles.profileImage}
20          resizeMode='cover'
21        />
22      </>
23    ) : (
24      <Image
25        source={require('@/assets/images/profile/profileImage.png')}
26        style={styles.profileImage}
27        resizeMode='contain'
28      />
29    )}
30  </TouchableOpacity>
31</View>- TouchableOpacity: Makes the image clickable, allowing users to change their profile picture which runs the
pickImagefunction to show the media library. - Loading Indicator: Shows while the backend API call is made and the image is uploading .
- Selected Image: Displays the user’s chosen profile picture.
- Placeholder Image: Shown if no profile picture is set. This can be stored in a file inside your app like the
public → assets → images → profile → profileImage.pngfolder.
Entire code
Below we have posted the entire code. This way you can have a bird-eye view of the entire implementation and as well as follow the steps outlined above in a much more thorough way.
1import AnimatedWrapper from "@/components/shared/animation";
2import GlobalButton from "@/components/shared/Button";
3import { Colors, globalStyle } from "@/constants/Colors";
4import { useSession } from "@/providers/Auth/AuthProvider";
5import React, { useCallback, useEffect, useState } from "react";
6import {
7  View,
8  Text,
9  StyleSheet,
10  Image,
11  ImageBackground,
12  TouchableOpacity,
13  ScrollView,
14  RefreshControl,
15  Alert,
16  ActivityIndicator,
17} from "react-native";
18import Subscription from "../../Subscription";
19
20import * as ImagePicker from "expo-image-picker";
21import actionProvider from "../../../../providers/actionProvider";
22import { useToast } from "../../../../providers/useToast";
23
24const HEIGHT = 80;
25
26const index = () => {
27  const { user, session, fetchUserInformation } = useSession();
28
29  const [modalVisible, setModalVisible] = useState(false);
30
31  const [loading, setLoading] = React.useState(false);
32  const [loadingImage, setLoadingImage] = useState(false);
33
34  const [selectedImage, setSelectedImage] = useState("");
35
36  const { showToast } = useToast();
37
38  useEffect(() => {
39    // If user has a profile picture, set it
40    if (user?.profilePicture) {
41      setSelectedImage(user.profilePicture);
42    }
43  }, [user]);
44
45  const onRefresh = useCallback(async () => {
46    // Start refreshing
47    setLoading(true);
48    fetchUserInformation(session);
49
50    // Simulate a network request or any async action
51    setTimeout(() => {
52      // Stop refreshing after 3 seconds
53      setLoading(false);
54    }, 3000);
55  }, []);
56
57  const pickImage = async () => {
58    // Ask for permission to access the gallery
59    const { status } = await ImagePicker.requestMediaLibraryPermissionsAsync();
60    if (status !== "granted") {
61      Alert.alert(
62        "Permission Denied",
63        "Permission to access gallery was denied"
64      );
65      return;
66    }
67
68    // Launch the image picker
69    const result = await ImagePicker.launchImageLibraryAsync({
70      mediaTypes: ImagePicker.MediaTypeOptions.Images,
71      allowsEditing: true,
72      aspect: [1, 1],
73      quality: 1,
74      base64: true, // Include base64 in the result
75    });
76
77    const completeBase64String =
78      "data:image/png;base64," + result?.assets[0]?.base64;
79
80    if (!result.cancelled) {
81      setLoadingImage(true);
82      uploadProfilePicture(completeBase64String, result?.assets[0].uri);
83    } else {
84      setLoadingImage(false);
85
86      showToast("error", "Failed to update profile picture");
87    }
88  };
89
90  const uploadProfilePicture = async (base64Image: string, uri: string) => {
91    const endpoint = "user";
92    const method = "PUT"; // Use PUT as per your requirement
93
94    try {
95      // Prepare the data object
96      const data = {
97        profilePicture: base64Image,
98      };
99
100      // Make the API request
101      const response = await actionProvider.makeRequest(endpoint, method, data);
102
103      if (response.status === 200) {
104        Alert.alert("Success", "Profile picture updated successfully");
105        // Optionally, refresh user information
106        fetchUserInformation(session);
107        setLoadingImage(false);
108
109        setSelectedImage(uri);
110      } else {
111        showToast("error", "Failed to update profile picture");
112        setLoadingImage(false);
113      }
114    } catch (error) {
115      setLoadingImage(false);
116
117      console.error("Error uploading profile picture:", error);
118      showToast(
119        "error",
120        "An error occurred while uploading the profile picture"
121      );
122    }
123  };
124
125  return (
126    <View
127      style={{
128        flex: 1,
129        backgroundColor: "white",
130      }}
131    >
132      <ScrollView
133        refreshControl={
134          <RefreshControl
135            refreshing={loading}
136            onRefresh={onRefresh}
137            colors={["#4096C1"]} // Customize spinner colors
138            tintColor="#4096C1" // Customize spinner color for iOS
139          />
140        }
141        contentContainerStyle={{
142          flex: 1,
143        }}
144      >
145        <View style={styles.container}>
146          <ImageBackground
147            style={styles.innerContainer}
148            source={require("@/assets/images/profile/profilePageImage.png")}
149            imageStyle={styles.backgroundImage}
150          >
151            <View style={styles.profileImageContainer}>
152              {/* This is the profile image section */}
153              <TouchableOpacity onPress={pickImage} activeOpacity={0.8}>
154                {loadingImage ? (
155                  <View
156                    style={[
157                      styles.profileImage,
158                      {
159                        justifyContent: "center",
160                        alignItems: "center",
161                      },
162                    ]}
163                  >
164                    <ActivityIndicator color={"#4096C1"} />
165                  </View>
166                ) : selectedImage ? (
167                  <>
168                    <Image
169                      source={{ uri: selectedImage }}
170                      style={styles.profileImage}
171                      resizeMode="cover"
172                    />
173                  </>
174                ) : (
175                  <Image
176                    source={require("@/assets/images/profile/profileImage.png")}
177                    style={styles.profileImage}
178                    resizeMode="contain"
179                  />
180                )}
181              </TouchableOpacity>
182
183              {/* This is the profile image section */}
184            </View>
185          </ImageBackground>
186        </View>
187      </ScrollView>
188    </View>
189  );
190};
191
192export default index;
193
194const styles = StyleSheet.create({
195  container: {
196    flex: 1,
197    backgroundColor: "white",
198  },
199  innerContainer: {
200    height: 200,
201    backgroundColor: Colors.button.backgroundButtonDark,
202    borderBottomLeftRadius: 40,
203    borderBottomRightRadius: 40,
204    alignItems: "center",
205    justifyContent: "flex-end",
206  },
207  profileImageContainer: {
208    position: "absolute",
209    bottom: -HEIGHT / 2,
210    height: HEIGHT,
211    width: HEIGHT,
212    borderRadius: HEIGHT / 2,
213    backgroundColor: "white",
214    padding: 5,
215    justifyContent: "center",
216    alignItems: "center",
217  },
218  backgroundImage: {
219    borderBottomLeftRadius: 40,
220    borderBottomRightRadius: 40,
221  },
222  profileImage: {
223    height: HEIGHT / 1.2,
224    width: HEIGHT / 1.2,
225    borderRadius: HEIGHT / 1.5,
226  },
227  infoContainer: {
228    alignItems: "center",
229    marginTop: 30,
230    flex: 1,
231  },
232  greetingText: {
233    fontSize: 20,
234    fontWeight: "bold",
235    fontFamily: globalStyle.font.fontFamilyBold,
236    textAlign: "center",
237  },
238  planContainer: {
239    marginVertical: 10,
240    backgroundColor: "rgba(64,150,193,.20)",
241    borderRadius: 5,
242    paddingVertical: 5,
243    paddingHorizontal: 20,
244  },
245  planText: {
246    color: "#000000",
247    fontFamily: globalStyle.font.fontFamilyBold,
248  },
249  buttonContainer: {
250    marginHorizontal: globalStyle.container.marginHorizontal,
251    bottom: 10,
252  },
253  premiumContainer: {
254    marginTop: 30,
255    width: "90%",
256    justifyContent: "space-between",
257    alignItems: "center",
258    backgroundColor: "#EFF6FA",
259    flexDirection: "row",
260    paddingVertical: 15,
261    paddingHorizontal: 10,
262    borderRadius: 10,
263  },
264  premiumContent: {
265    flexDirection: "row",
266    alignItems: "center",
267    flex: 0.8,
268  },
269  premiumIcon: {
270    height: 30,
271    width: 30,
272  },
273  premiumText: {
274    fontFamily: globalStyle.font.fontFamilyBold,
275    fontSize: 16,
276    marginLeft: 15,
277  },
278  upgradeText: {
279    fontFamily: globalStyle.font.fontFamilyBold,
280    color: Colors.button.textDark,
281  },
282});
Conclusion
In this blog post, we’ve demonstrated how to implement an image picker in your Expo React Native application to allow users to upload and update their profile images. This feature enhances user engagement by adding a personalized touch to their profiles.
If there is anything unclear in this blog post, feel free to reach out to DETL and we will be happy to help you through the journey of implementing this.
Happy Coding!